Penpot’s practical guide to multi-directional AI workflows
Learn about practical use cases for design to code, code to design, and design to docs AI workflows with Penpot MCP.

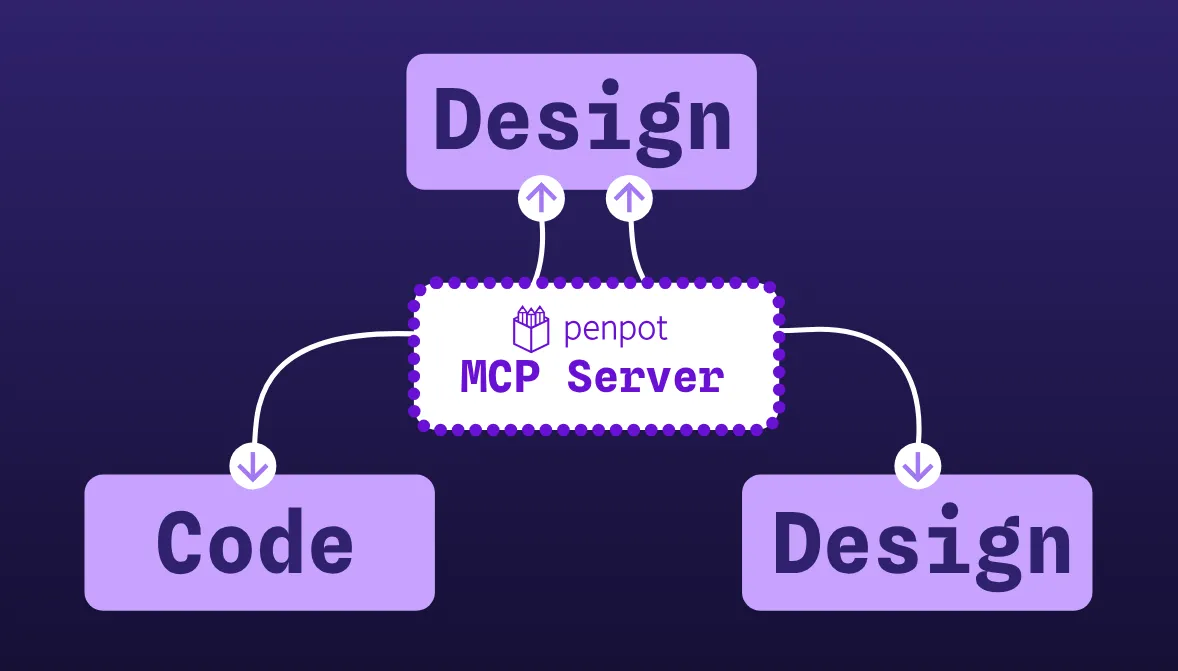
One of the benefits of Penpot’s MCP (Model Context Protocol) Server is that you can create truly multi-directional AI workflows. Not only can you generate designs inside your Penpot file, you can also generate code or documentation. You can also go in the other direction, generating Penpot designs from code or docs.
If you’re looking to create professional-level design, code, or documentation with your AI workflows, you need to be able to verify the output quality. I covered other limitations of AI workflows (including: it’s not magic!) in the post on Penpot AI workflows explained. We’ll look at some examples of good workflow practice at the end of this post.
Design to design AI workflows
Design to design workflows mean you can generate, edit, and extend your Penpot designs. This is most useful when you want to explore possible designs or audit the coverage of your designs (particularly at scale!) For example, ask your AI agent to:
- Generate designs for new screens using existing components and variants. For example, you’re changing your marketing site’s information architecture and you need to produce alternative navigation and page hierarchy designs.
- Explore possible dashboard layouts with combinations of different components in different compositions, densities, and viewport sizes to see where components and layouts don’t hold up.
- Suggest component variants for missing states and edge cases using existing components and design tokens. For example, states we often forget to design for include empty, permission denied, partial failure, offline, stale data, and bulk action states.
- Produce versions of layouts with stress-tests for long and translated strings (like Japanese or German) to verify whether responsive behaviors work.
- Propose changes for accessibility compliance. Flag poor color contrast combinations, missing focus styles, and hit targets that are too small.
Design to docs AI workflows
Docs are valuable but we all know they go stale quickly, and are often the last task on both designers’ and developers’ checklists. Design to docs workflows can help you keep your docs in sync with your design work. Some design to docs workflows you might try:
- Generate changesets so your teammates don’t have to play spot-the-difference between the old and new designs. Include a list of what changed, the affected flows, images (before and after) and links to the relevant boards.
- Produce specification docs for features that include component usage rules, states, content guidelines, relevant token references and accessibility requirements.
- Create QA (Quality Assurance) checklists from UI designs, producing a test plan for each flow that includes the happy path, edge cases and error handling. You can then ensure the checklist matches real UI states and capture any missing states as follow-up tasks.
- Turn boards into a narrative for reviews (including the problem, approach, trade-offs, risks), while keeping the source in Penpot. This then makes it easy to regenerate the narrative when the designs change.
Design to code AI workflows
Design to code workflows are most useful when they produce a draft version that’s easy to iterate on. If you’re not a developer, you may not know whether the code output is well-written or fits the constraints of the tech stack, so you’ll find generated code more useful as a starting point. As a developer, you might find it useful to have the basics generated for you, so you can refine and iterate from there.
Examples include:
- Generate code-based prototypes from designs, going from static “pictures of interfaces” to interactive artifacts that behave more like the real thing. Interactive prototypes can help designers get a better feel for how their design decisions will work out on the intended platform. In this case, the code quality doesn’t matter (as long as you don’t let the generated code end up in production!)
- Produce design token files and CSS that maps to your target stack (HTML + CSS, React + CSS variables, Vue etc.) You can specify that the agent must use Penpot’s token definitions and CSS properties as the source of truth. This will help ensure the final product matches the original design.
- Create a pipeline for generating icon components as SVG components or files optimized for your stack. You can include naming conventions, viewBox properties, and any wrappers necessary for any framework you’re using. Then you can even create a script to regenerate whenever the icons are updated in the Penpot file.
- Generate Storybook stories (or equivalent) for each component/state in Penpot. You can specify that the agent uses Penpot components as references for stories and define variants as props.
Code to design AI workflows
Code to design workflows help when the live product has got ahead of the design file, or a design system exists more in CSS and frameworks than in a visual library. We all know there are usually way more developers than designers on a team! Some code to design workflow examples include:
- Extracting a code-based design system into Penpot so you can onboard non-coding designers. You could extract CSS variables as design tokens, generate components and variants from code components and props.
- Document a legacy UI for redesign. You could get the agent to generate a Penpot file that contains boards for each view and a full component inventory. Then designers can use it to plan changes with small adjustments without having to manually recreate the whole product.
- Identify differences between actual implementation and intended design when there’s been drift. You could generate boards from the current code and organize them side-by-side with boards for the intended design. Then even add Penpot comments to pinpoint and annotate the specific locations of divergence.
These are not the only type of workflows you can create using Penpot MCP. When we say multi-directional, it’s because there are so many more possible permutations between design, code, and docs…
Creating AI workflows that actually work for you
Writing a good prompt is just the beginning of a good workflow, and it’s easy to get fixated on writing the “perfect prompt.” But you’ll get better results if you treat the first input and output as the beginning of the process. Iterating is encouraged so you can treat the first output as a first draft, and then refine the output with more specific instructions in response to what the agent generates.
Planning a good workflow
It’s hard to recommend specific workflow outlines, because they’re so dependent on your source context, environment, and team. However, there are some key elements you don’t want to miss. Specify intent, context, tasks, checkpoints, and output. And don’t forget the verification step:
- Intent: What problem are we solving, who for, and what does “done” look like?
- Context: What should the model know (constraints, style, naming conventions, stack, brand rules, examples of good/bad)?
- Tasks: Small steps are more reliable than one big “do everything” prompt.
- Checkpoints: When the agent should ask you for feedback or further information.
- Desired output: A specific format (board, component, copy, code, checklist, ticket text, test plan, and so on).
- Human verification: Do a pass for correctness, safety, and check for areas where conformance and consistency is important (facts, accessibility, security, performance, design consistency). Remember that a model can be very confident even when it’s wrong!
Your knowledge, skills, and experience are key to the success of a good workflow. You can only review if the model is doing a good job if you have the ability to review the work. Some suggestions for workflow approaches that take that value into account:
- Design, code and docs: You own and control the decisions; AI speeds up drafting and exploration.
- Audits: AI suggests issues/questions; you decide what matters.
- Reviews: You create standard prompts and review steps; AI follows those steps to reduce the variation in model outputs.
Penpot MCP Server is built for multi-directional workflows. Pick one specific task from your current project, set your constraints, and run a small workflow you can verify. If you want to know where to start, follow the Penpot MCP setup guide (or one of the tutorials below) and try one workflow end to end before you scale it across your team.
Related Blogs
Want to get started with AI workflows in Penpot? Pick the tutorial for you: