Set up Penpot MCP with OpenRouter and OpenCode in 6 steps
One of the fastest ways to set up Penpot for AI workflows in just 6 steps, no coding required, and only using free, open, and/or low-cost tools.

Design and development workflows can use AI models (large language models, or LLMs) such as Claude, Gemini, and GPT. Penpot’s Model Context Protocol (MCP) lets an AI client connect to your Penpot file, as well as providing the APIs to edit and generate new designs and code. Penpot MCP is agnostic; it’ll work with any of your preferred models and AI clients.
When I started working on this tutorial, I had two goals in mind:
- Make it easy for a non-technical designer to follow without having to write code.
- Use free, open, and/or low-cost tools available on multiple platforms.
I’m going to show you how to set up an AI workflow using a Penpot file on design.penpot.app. We’ll connect to the file using the remote MCP server and an AI client (the software you use to write prompts and get data back) on your computer. We’ll use OpenCode as the AI client, but you can use any client you like. And we’ll be using OpenRouter for the AI models, as that gives us the option to pick from many different models. But again, you’re free to use any model you like.
What follows is a step-by-step guide, where I will walk you through:
- Step 1: Enable Penpot MCP and generate an MCP key
- Step 2: Sign up for an OpenRouter account and generate an OpenRouter API key
- Step 3: Install OpenCode
- Step 4: Add Penpot MCP to OpenCode’s config
- Step 5: Create or open your Penpot file and check Penpot MCP is active
- Step 6: Write your first prompt
What you’ll need before we start:
- A free Penpot account.
- A code editor or text editor. (Don’t worry, you don’t have to write any code! Just some copying and pasting.)
At the end of this tutorial, you will be able to write AI prompts that can review and understand your Penpot files, edit your existing designs, and create new design work from scratch.
1: Enable Penpot MCP and generate an MCP key
Penpot MCP will be the bridge between your AI client and your Penpot file.
- Go to your account settings in Penpot.
- Under the Integrations section, enable Penpot MCP.
Enabling Penpot MCP will open a modal with the option to generate your MCP key. An MCP key is a secret token used access your Penpot files. Anyone with your MCP key can connect to your files, as long as the MCP is enabled.
- Choose an expiration date and generate an MCP key.
You can generate your key with no expiration date, unless you have a reason to require an expiration date.
Save your MCP key to your password manager as you won’t be able to copy and paste it again. If you accidentally share or lose your MCP key, you can always delete the existing key and generate a new one. (You’ll need to update everywhere that used the old key to use the new key.)
- Don’t close the MCP key modal yet. We’ll need the configuration code in a minute.
2: Sign up for an OpenRouter account and generate an OpenRouter API key
OpenRouter will provide the AI models.
Penpot isn’t affiliated with OpenRouter, I’ve just found it a useful tool for working with multiple models. OpenRouter will give you access to many LLMs, most paid for by credits, and some for free.
You can use any model with Penpot MCP. If you already have a preferred model or router, you can use its API key to connect it to OpenCode by following the steps in section 3, and choosing your preferred model or router from the providers list.
- Create an OpenRouter API key.
As soon as you sign up, you’ll be asked to create an API key. An API key is like a unique username to access OpenRouter using code. As with your MCP key, create your API key and save it to your password manager for later.
2a: Buy OpenRouter credit
- Optional: Add credit to your OpenRouter account.
Add some credit to your OpenRouter account if you want to use the paid models. The paid models are generally more useful than the free models, especially for more complex tasks. I added just $10 to my account didn’t set up the auto top-up because it’s very easy to burn through credits and I didn’t want to burn through money!
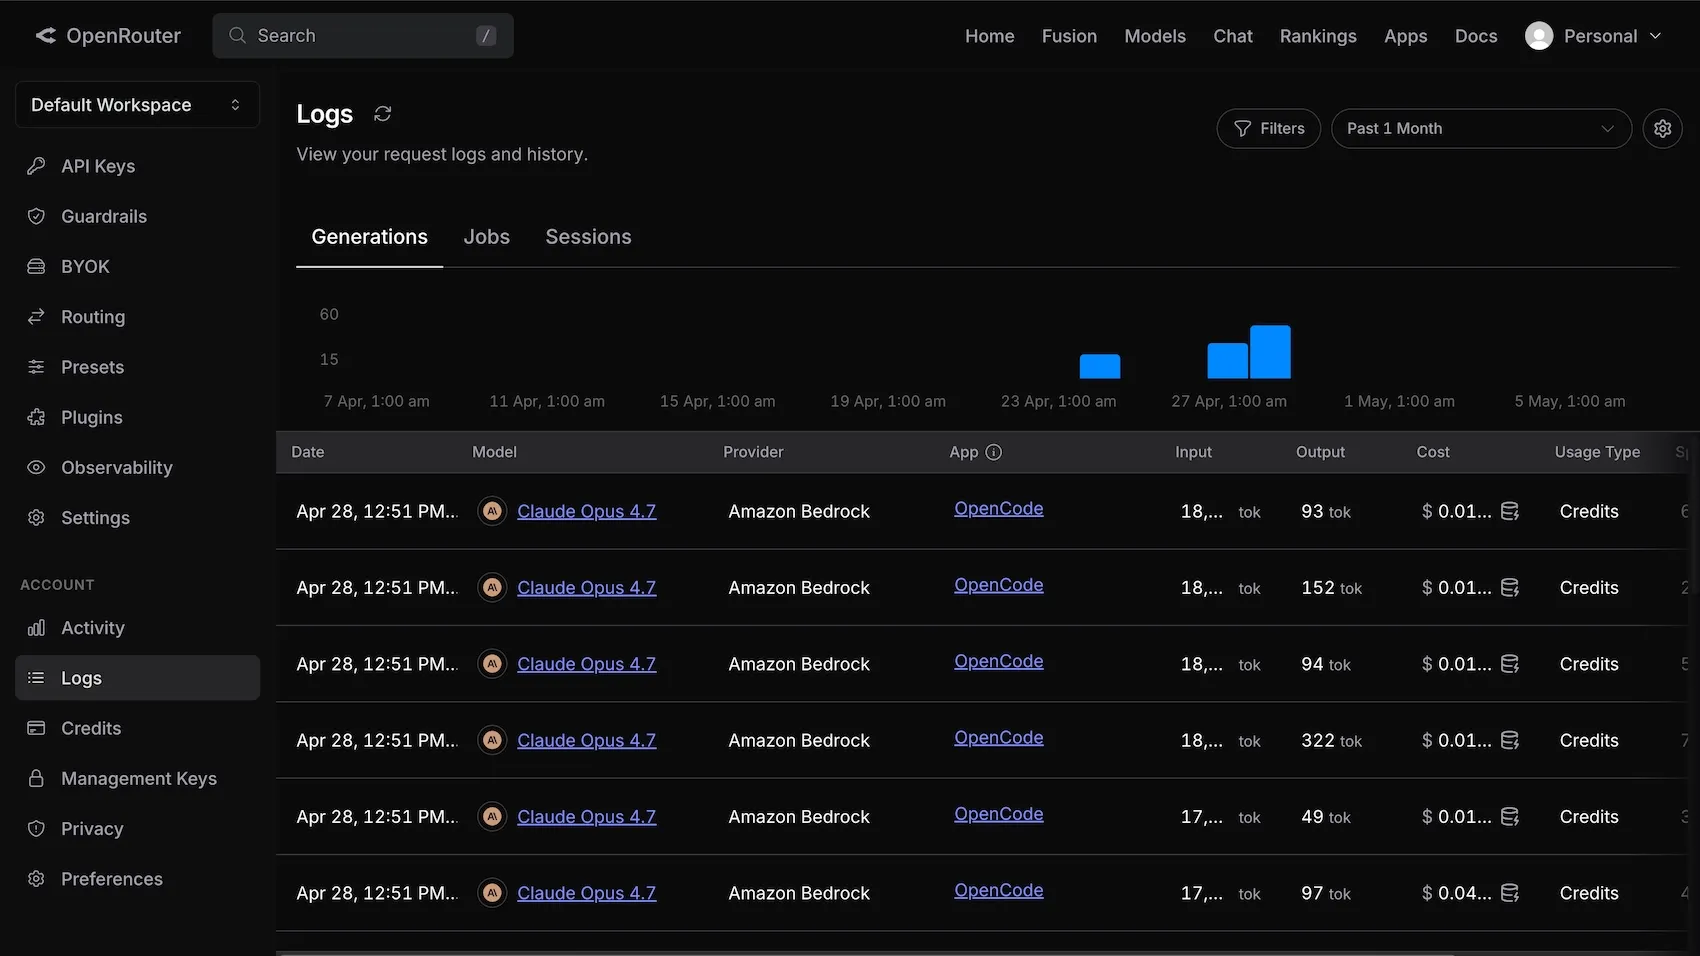
You can go to the Logs under your OpenRouter account settings at any time, and view how much you’re charged for each “generation.” These logs and fees can be helpful to give you insight into the real life financial and energy costs of your prompt input and AI output.
3: Install OpenCode
OpenCode will be your AI client.
- You can download OpenCode for free from their website.
Penpot isn’t affiliated with OpenCode, but I’ve found their desktop app an excellent tool for getting started without having to use the terminal or write any code. - Install the OpenCode app on your computer and open it up.
- Open an empty folder or existing project from the start screen in OpenCode.
If you want to work with an existing codebase or repository, then open that folder. Otherwise, create an empty folder on your computer. This folder will contain the config file for connecting to Penpot MCP (and any other configuration settings you want to specify for OpenCode.)
Every time you want to use Penpot MCP, you’ll need to make sure this folder is open in OpenCode. You can always duplicate the config file to use it in multiple folders or projects. I’ll show you how to create the config file in a moment.
3a: Connect OpenRouter as an OpenCode provider
- Go to OpenCode’s menu in the top left, and then choose the settings from the menu sidebar.
- Select the Provider settings from the Server section.
- Scroll down the list to find OpenRouter.
- Connect OpenRouter by pasting in your OpenRouter API key that you saved earlier.
You should then get a message confirming “OpenRouter models are now available to use.”
4: Add Penpot MCP to OpenCode’s config
Okay, this is the only bit in the process that resembles coding. But don’t go away… this will just involve a little bit of copying and pasting!
- Open a code editor or plain text editor.
- Create an empty file named
opencode.jsoncin the folder you opened earlier.
This is the configuration file for OpenCode where you can save all your personal or project-specific settings. - Copy the configuration code from the larger text area in Penpot’s MCP settings.
The code will look like this, but contain your unique MCP key (userToken):
{
  "mcpServers": {
    "penpot": {
      "url": "https://design.penpot.app/mcp/stream?userToken=eyJhbGciOiJBMjU2S1ciLCJlbmMiOiJBMjU2R0NNIn0.sDQyQUeJPmS5L1tW0uEedad1ttfCd7CP5YGKxIM8bpWsyw6wuMJpCQ.YOtB7iQuGdUtvaFF.EpYInCSAqU5GkFOSzAd5otnYvPeAgNT_DhjxfuCZqNHG9wPnC2Muge0_K6j-AisnU-HNHb5YEyDGKe1H22AXVFWfg5GArrIEfoGf-cwGBdFJVL9fK8zBQOu7J72kXJ8Y0QWUPKWsxXQh9Hpj3ZZtxNrqyXFosY6T2SVfYforNrkU9Svh9iNrQEr_p6_EgnEwzeY4R0Ys3V-Z.rxW4EyOYE3dy77UxgWGSTQ"
    }
  }
}
Warning, if you use this exact code with my MCP key, it won’t work! Use the key from your own Penpot account.
- Paste the config code into the
opencode.jsoncfile.
4a: Tweak the config file for OpenCode compatibility
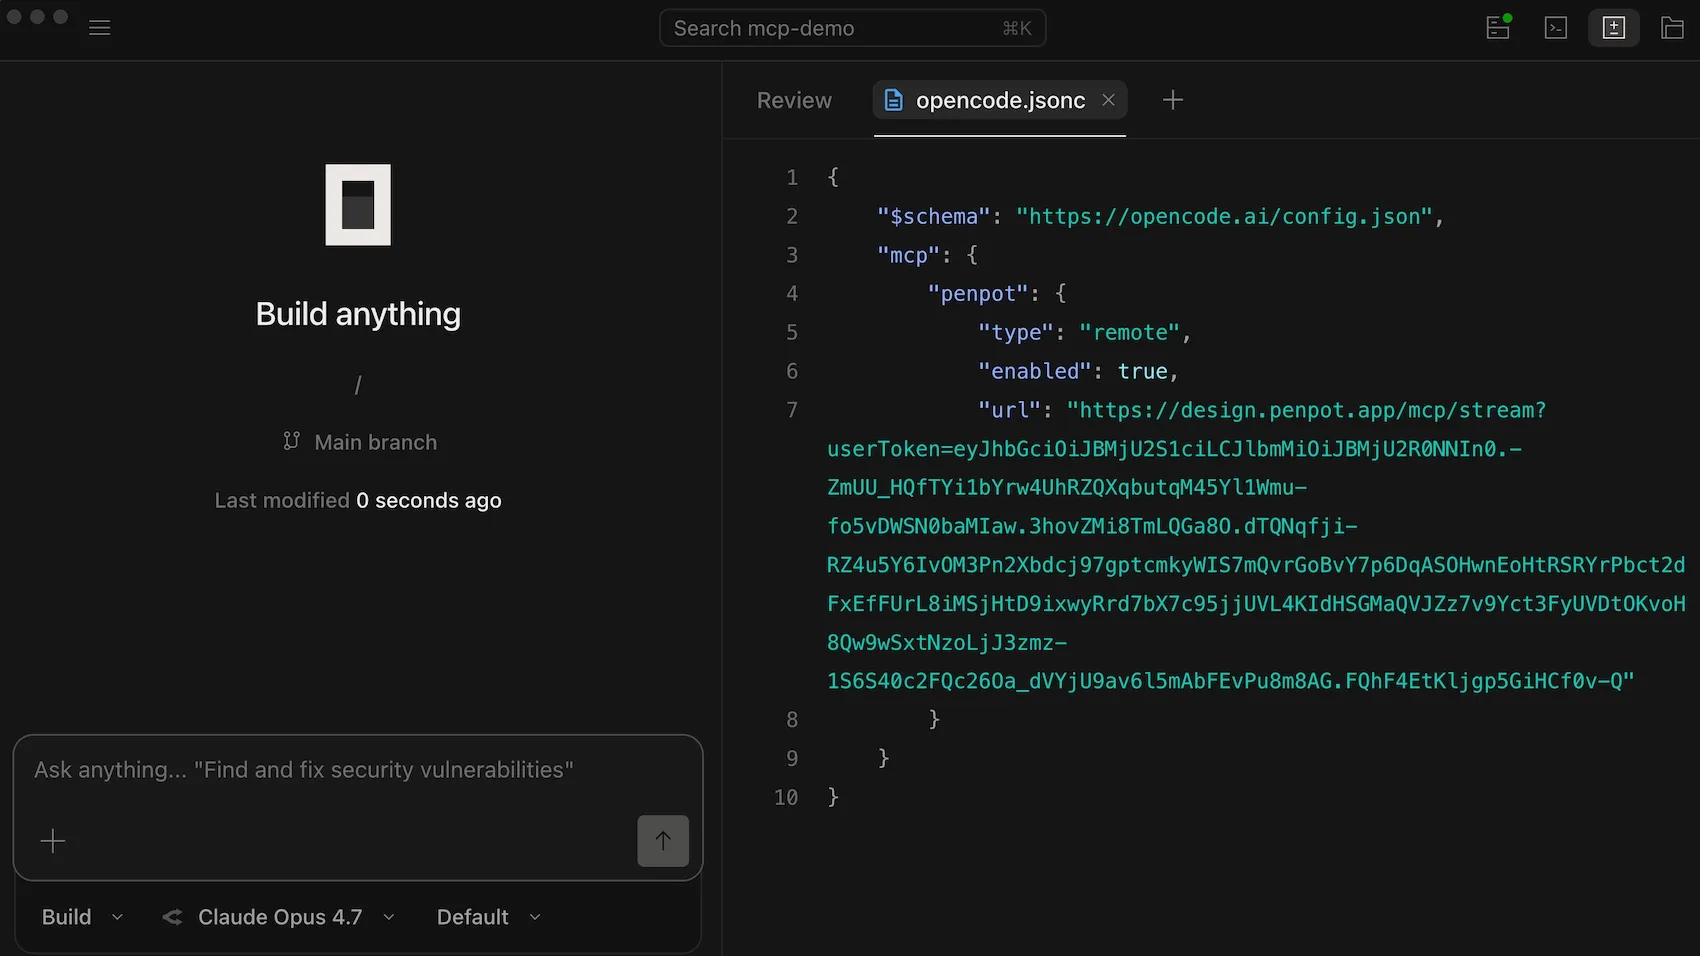
Now there are just a few changes to make to your file to ensure it is formatted correctly to work with OpenCode.
{
+ "$schema": "https://opencode.ai/config.json",
- "mcpServer": {
+ "mcp": {
    "penpot": {
+     "type": "remote",
+     "enabled": true,
      "url": "https://design.penpot.app/mcp/stream?userToken=eyJhbGciOiJBMjU2S1ciLCJlbmMiOiJBMjU2R0NNIn0.sDQyQUeJPmS5L1tW0uEedad1ttfCd7CP5YGKxIM8bpWsyw6wuMJpCQ.YOtB7iQuGdUtvaFF.EpYInCSAqU5GkFOSzAd5otnYvPeAgNT_DhjxfuCZqNHG9wPnC2Muge0_K6j-AisnU-HNHb5YEyDGKe1H22AXVFWfg5GArrIEfoGf-cwGBdFJVL9fK8zBQOu7J72kXJ8Y0QWUPKWsxXQh9Hpj3ZZtxNrqyXFosY6T2SVfYforNrkU9Svh9iNrQEr_p6_EgnEwzeY4R0Ys3V-Z.rxW4EyOYE3dy77UxgWGSTQ"
      }
   }
}- Above the
"mcp"line, create a new line (with the same indentation) and paste in"$schema": "https://opencode.ai/config.json", - Replace
"mcpServers"with just"mcp" - Above the
"url":line, create a new line (with the same indentation) and paste in"type": "remote", - Under that line, create a new line (with the same indentation) and paste in
"enabled": true, - Save the file.
This will make sure that the config file is formatted correctly for OpenCode.
Once you have added this config to the opencode.jsonc file, you can check the Penpot MCP server status in the top menu bar.
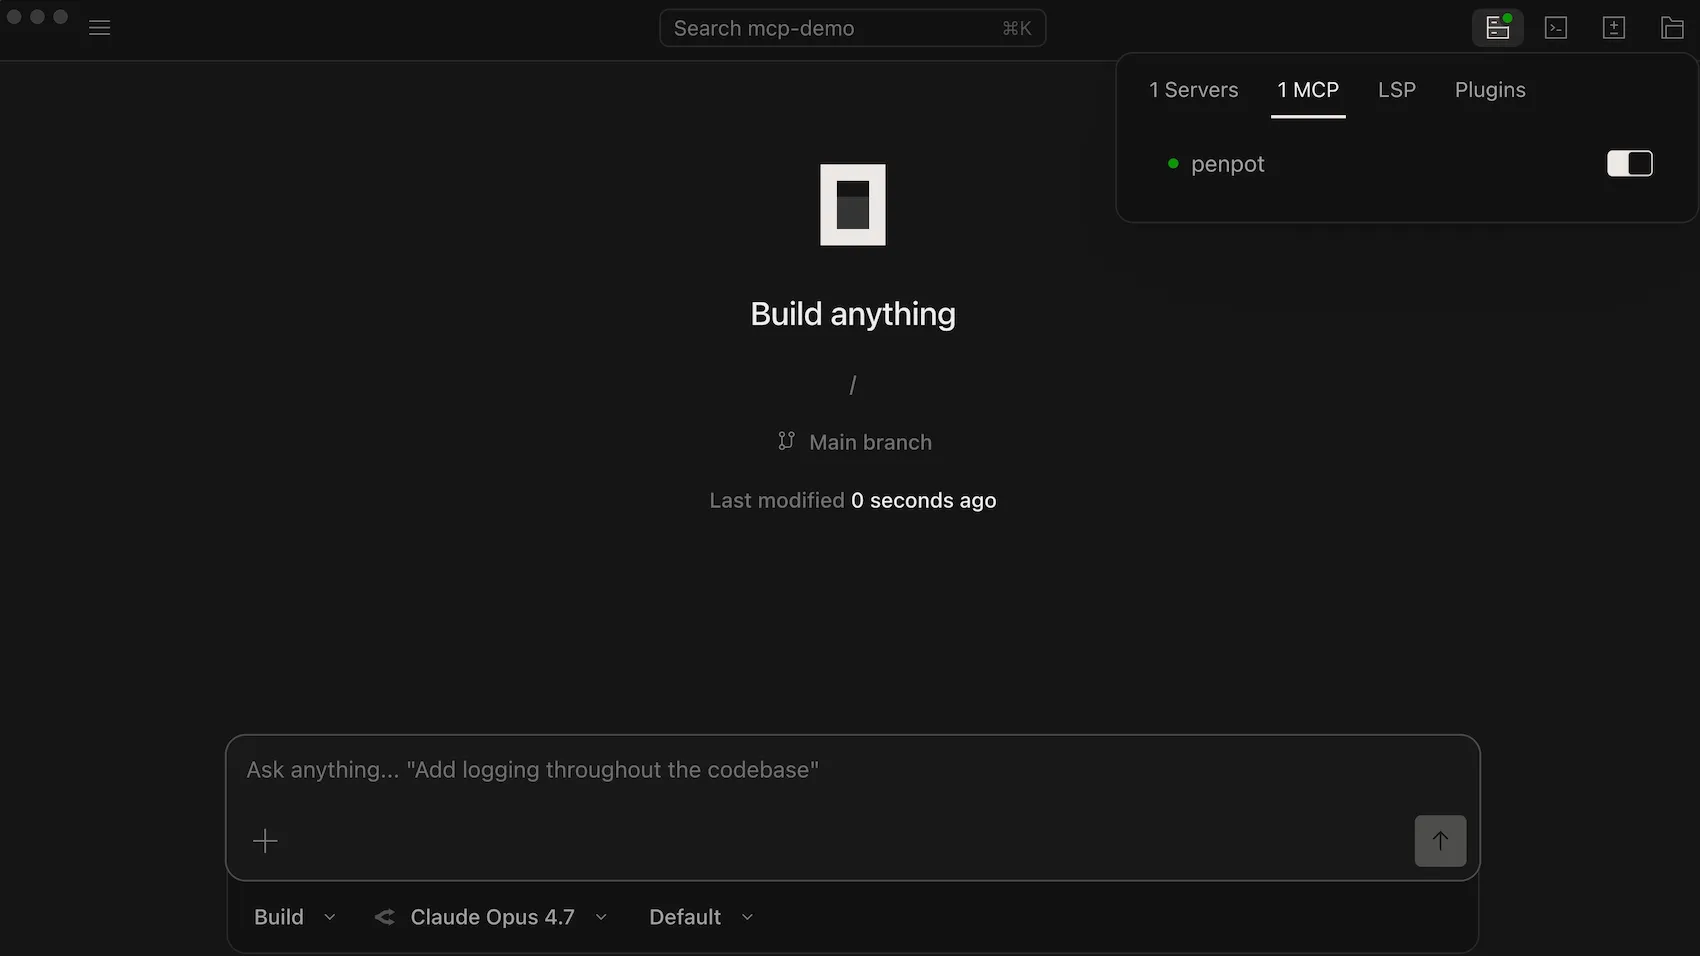
If you have added the config file correctly, you should be able to see the Penpot MCP server listed under MCP.
You may need to reload or restart the OpenCode app so that it registers changes to the config file.
5: Create or open your Penpot file and check Penpot MCP is active
Penpot MCP works with your current open file in Penpot.
- Navigate to the Penpot file you want to work with from the Penpot dashboard.
- Check that the Penpot MCP server is active in Penpot:
- Open the main menu from inside your Penpot file
- Under the MCP server section, it should say Disconnect (This shows it is connected.) And Manage (Status: enabled). (This shows it is enabled.)

6: Write your first prompt
You can now return to OpenCode to write your first prompt. Before you do real work, it might help to read Juan’s guide on writing prompts and his guide to efficient prompting. For now, here’s the basics so you can test that the setup we’ve created together is working:
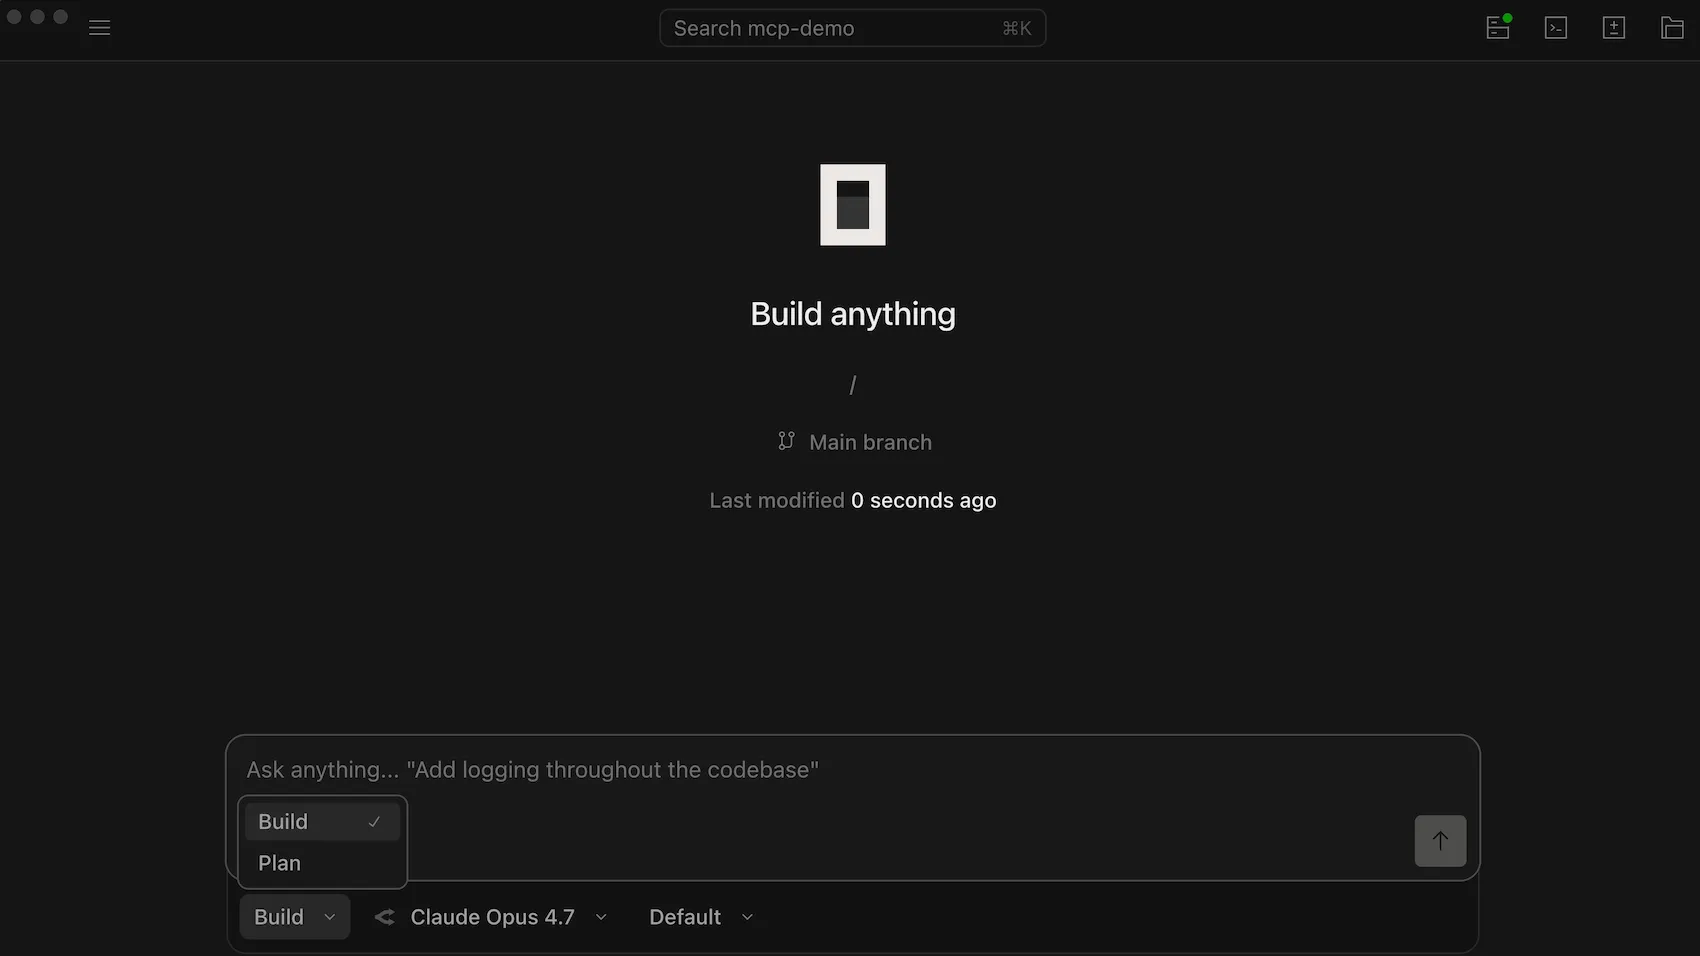
6a: Choose your mode and model
- Choose Plan mode.
Under the chatbox in OpenCode, there are two modes to choose from: Plan and Build. Start in Plan mode so the agent won’t change your Penpot file without permission. This is a great mode to start and test with!
- Choose your preferred model from the OpenRouter section.
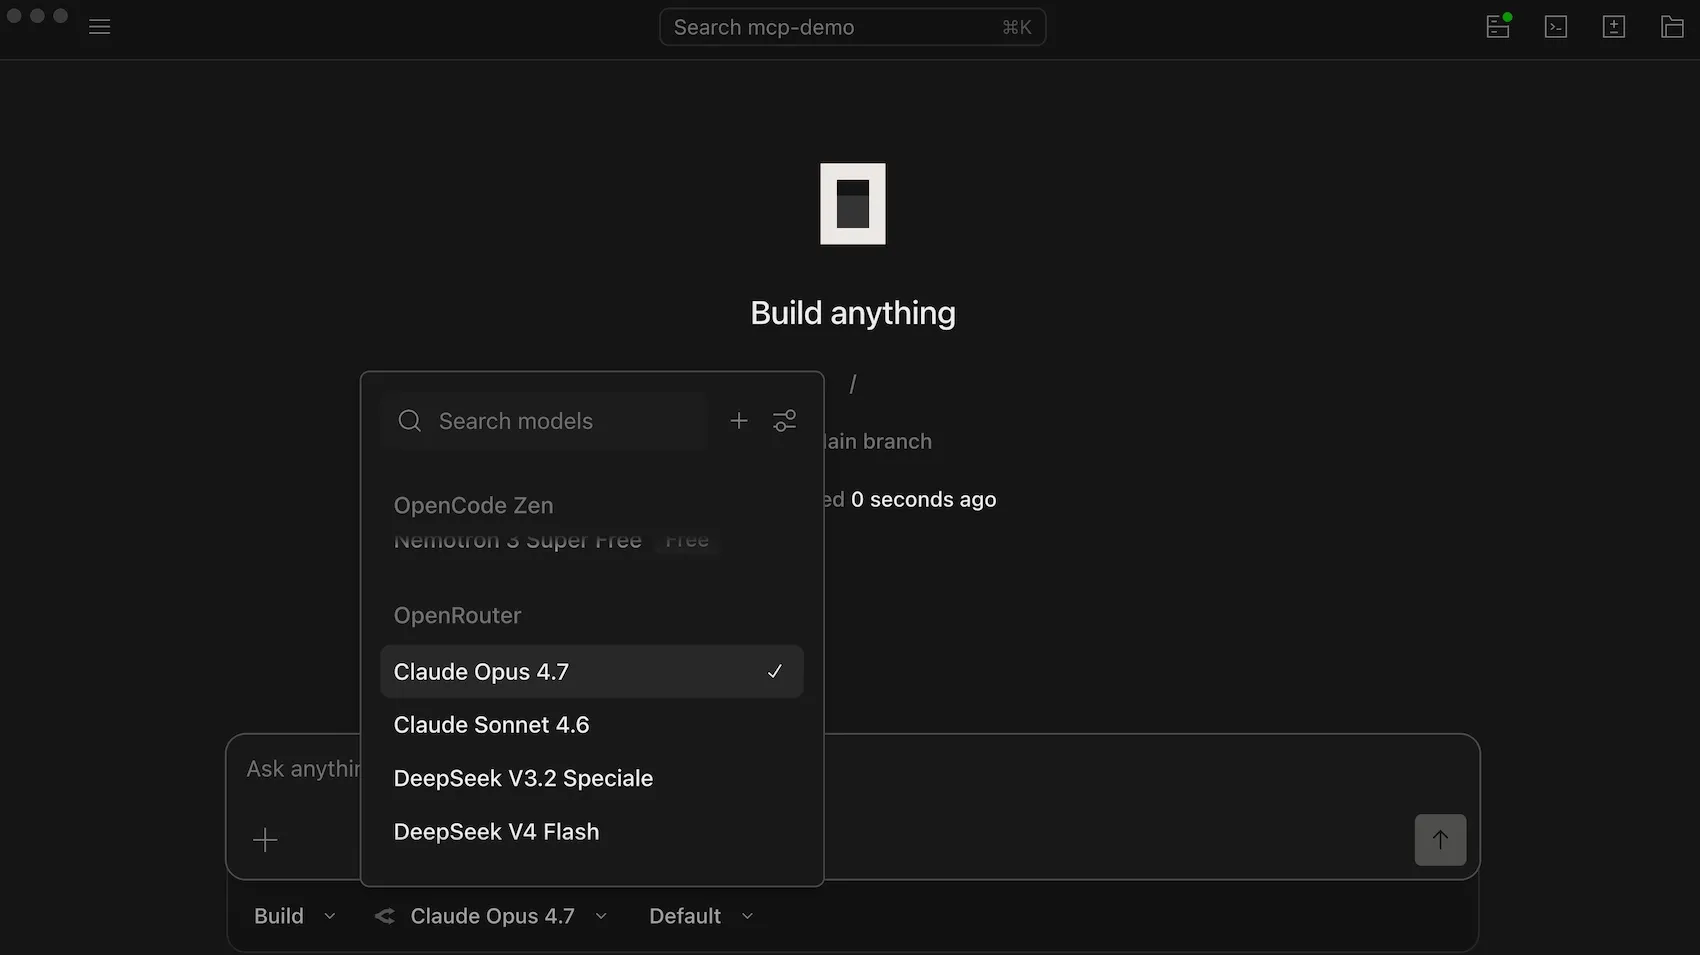
The next menu under the chat box in OpenCode is the Model menu. From here, you can choose from all the models available to OpenCode. You’ll want to choose an option from the OpenRouter section as this is the provider you’ve configured above.
6c: Try it out!
I recommend you test everything is working by asking it something about the file rather than executing any tasks. This helps you double check that you’ve got the right file open and ready to work with.
- Paste this into chat: “
What is the name of my current open Penpot file?”
If it responds with the correct Penpot file name, you’re good to go!
Troubleshooting MCP connections
You might come across issues during the setup process. If something isn’t connecting, try these fixes:
- Reload or restart OpenCode.
- Disconnect and reconnect the MCP server from the main menu inside your Penpot file.
- Check the MCP key in your config file matches the key in your Penpot account.
- Check the formatting of your OpenCode config file.
- Ensure you have enough OpenRouter credits.
- Ensure you haven’t exceeded your OpenRouter credit limit (if you set one).
If you’re still having setup headaches, try searching for solutions in the Penpot community.
When using AI workflows for design and development, you should be aware of the limitations. AI is not magic, it will generate design and code based on your specific instructions. If you don’t provide sufficient data, AI will use its existing training data to create work based on the average of design and code outputs online.
Using AI models can also be expensive, both financially and computationally (which requires huge amounts of energy) as tokens are needed to help the model understand your input, as well as produce its output. For more complex tasks, you will need to use a model that is capable of complex reasoning, but this entirely depends on your needs and the tasks you want to execute.
The Penpot user guide has some great suggestions using Penpot MCP as part of your design and development workflow. You can create AI workflows to generate design tokens, create variants for your components, or audit your design system. Get more inspiration from the Penpot MCP video playlist.
Related Blogs
We’ve got loads of resources for using Penpot with AI workflows. Here are some more to get you started: