What is UX design?
Learn what UX design is, why it matters, and how to become a UX designer. Explore key skills, UX vs. UI, the design process, and steps to start your career.

What is UX design? What new designers need to get started
You open a food delivery app. In thirty seconds, you’ve found a restaurant, customized your order, and you’re already closing your phone. Now imagine trying to renew your driver’s license on a government website. Same task, fundamentally different experience. It's rare for someone to close a government website, thinking "that was smooth". The gap between those two moments, and the lack of a delicious meal afterward, is UX design, and most of the time, you only notice it when it’s missing.
Read on to learn what UX design involves (and what it doesn’t), and how to start building meaningful products people actually want to use. You’ll even pick up some tools for how to start your first user-focused designs right now!
What is UX design?
User experience design (UX design) is a process and a discipline focused on the people using a product and the goals they want to achieve. It’s about making sure a product or service meets real needs, motivations, and behaviors, resulting in a smooth and enjoyable experience.
But it’s also a mindset. Teams that commit to UX from the beginning make every decision through that lens, so the final product is something users actually want to use, not just something that looks flashy.
UX vs. UI: the screenplay and cinematography analogy
UX and UI get used interchangeably all the time, but they aren’t the same thing.
Watch Video on UI and UX difference. Learn the basics with Penpot's UI design free course.
Think about a film you love. Now imagine it shot badly, flat lighting, shaky framing, every scene looking the same, regardless of what’s happening. The story might still be there but something essential is gone. Now flip it: a visually stunning film with a script that goes nowhere, characters you don’t care about, scenes that don’t connect…

Consider UX as the screenplay. It gives the product structure, intention and direction. It decides what happens and why.
UI, on the other hand, is the cinematography. It decides how every single moment lands: the color, the weight, the rhythm and the feeling a person gets.
A great screenplay shot badly fails. Extraordinary cinematography in the service of a broken story fails, too. UI design and UX design are just two crafts that need each other completely. Both deserve full attention.
You can see examples of UI design trends all around you, such as dark mode as default and glassmorphism, but they should always follow good UX design principles of flexibility and efficiency.
What does a UX designer actually do?
A UX designer incorporates UX principles into their core mission: turning user problems into design solutions. They ask and solve questions such as, “Does this product make sense?” and “Does it solve the intended problem?” as well as “Is this easy to use?”
Their day-to-day may involve conducting research, creating wireframes, making prototypes, or sitting with beta testers and watching them struggle (or not 🙌) with an interface. They also collaborate across marketing, development, and other design teams to make sure the best improvements are incorporated into each iteration.
There are usually several UX designers working on projects, especially in larger corporations. In that case, each designer will specialize in a particular area:
- The UX designer works as a generalist throughout the entire process.
- The UX researcher runs customer surveys and gathers feedback.
- The UX writer drafts interface copy.
And then there’s the Interaction designer, who focuses on how users engage with the design elements. It's the role that lives closest to the boundary between UX and UI.
While a UX designer seems similar to a product designer, these roles are typically separate at most companies. The product designer focuses on the product lifecycle, from market research to market-ready app, and can include business strategy. UX designers are usually brought in as soon as there’s a product idea or a problem to validate, focused entirely on the user side.
The key skills for UX designers
The rapid growth of AI tools has changed how UX designers work, but it hasn’t eliminated the need for both technical and human skills.
Technical skills are those abilities that directly relate to the job of UX design.
- User research and analysis, including a knowledge of qualitative and quantitative methods, interviewing, and reading surveys
- Information architecture, such as organizing content and creating logical structures
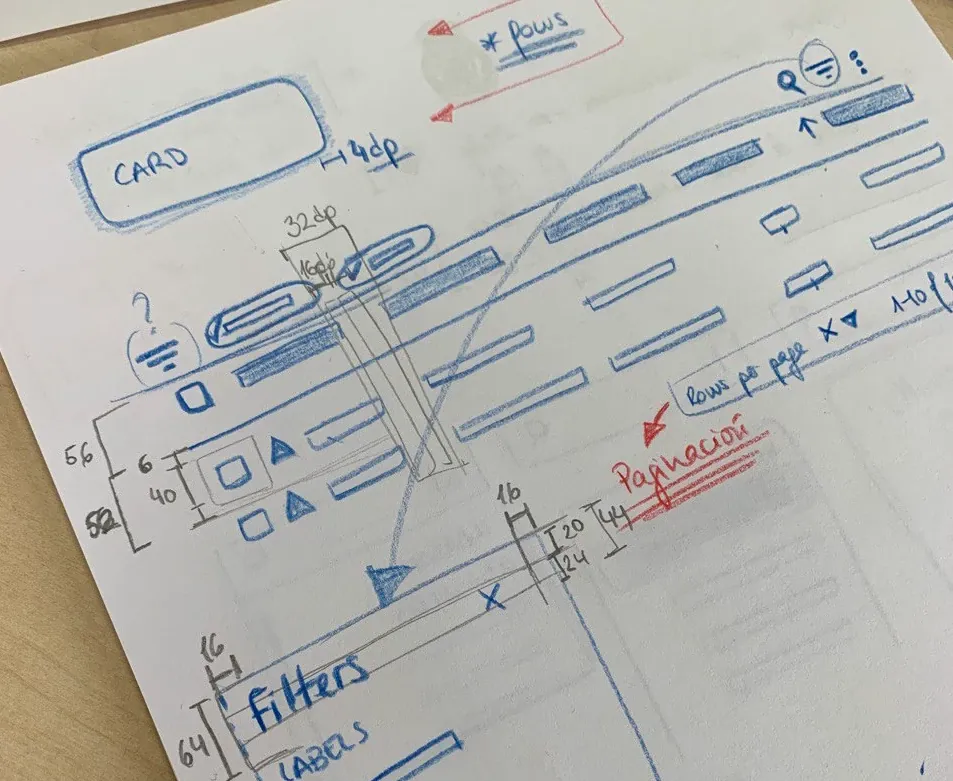
- Wireframing and prototyping, including both low-fidelity and high-fidelity models
- Visual and UI design, including color theory, typography, and composition
- Basic HTML/CSS code and development knowledge
- Familiarity with creating, updating, and using design systems and design tokens
UX designers should also know how to use design tools such as Penpot, both as a creative tool and a collaborative platform.
On the human side: curiosity, empathy, the ability to listen to feedback without getting defensive, and the patience to iterate on something long after everyone else in the room has declared it done.
Most teams use AI tools now, and knowing your way around them is quickly becoming the baseline. They're genuinely good at speed and scale: summarizing research notes or scanning large volumes of user feedback for patterns. It can also feed back your research findings and serve as a brainstorming partner. That means your real value is in the thinking around that work: choosing what to research, defining the actual problem, and understanding users in ways a tool can't. Learn them the same way you'd learn anything else that makes you sharper at your work.
How to actually become a UX designer
Here's an honest roadmap for complete beginners to become career-ready. (Timelines vary a lot based on previous ability, how much time you can commit and opportunities available where you live.)
Step 1: Learn UX fundamentals, including core concepts of user-centered design, design thinking, and the UX process from research to delivery. Nielsen’s 10 Usability Heuristics can be very helpful here!
Step 2: Choose your educational path, keeping in mind that portfolios and connections may matter more than credentials. Options include:
- Free resources, such as Google UX Certificates or courses from the Interaction Design Foundation
- Paid online courses to learn at your own pace
- Intensive UX bootcamps with mentorship opportunities
- Traditional two to four year UI/UX or digital product design degrees with an added focus on more well-rounded learning, including business, psychology, or another concentration
Step 3: Master the tools. Get comfortable with essential wireframing and prototyping tools, such as Penpot. The beginner-friendly platform exposes you to CSS standards from day one, making you valuable to employers across industries. Plus, it’s free 😏
Step 4: Build a portfolio. Two to four of your strongest case studies, showing your process, not just the final design. No professional experience yet? Practice redesigning existing apps (and indicate they were unsolicited). Volunteering your time or donating design services to a non-profit can also give you a boost. Charitable groups often advertise these opportunities on job boards or LinkedIn.
Step 5: Grow your network. Meet other UX professionals in different industries, and attend their meetups and events. Search “UX,” “UI/UX,” or “product design” by city on Meetup and Eventbrite. Start with an internship or a junior role. Experience builds connections, and connections build careers. Penpot organizes events via its Ambassador program: check whether there are any online or IRL events of your interest.
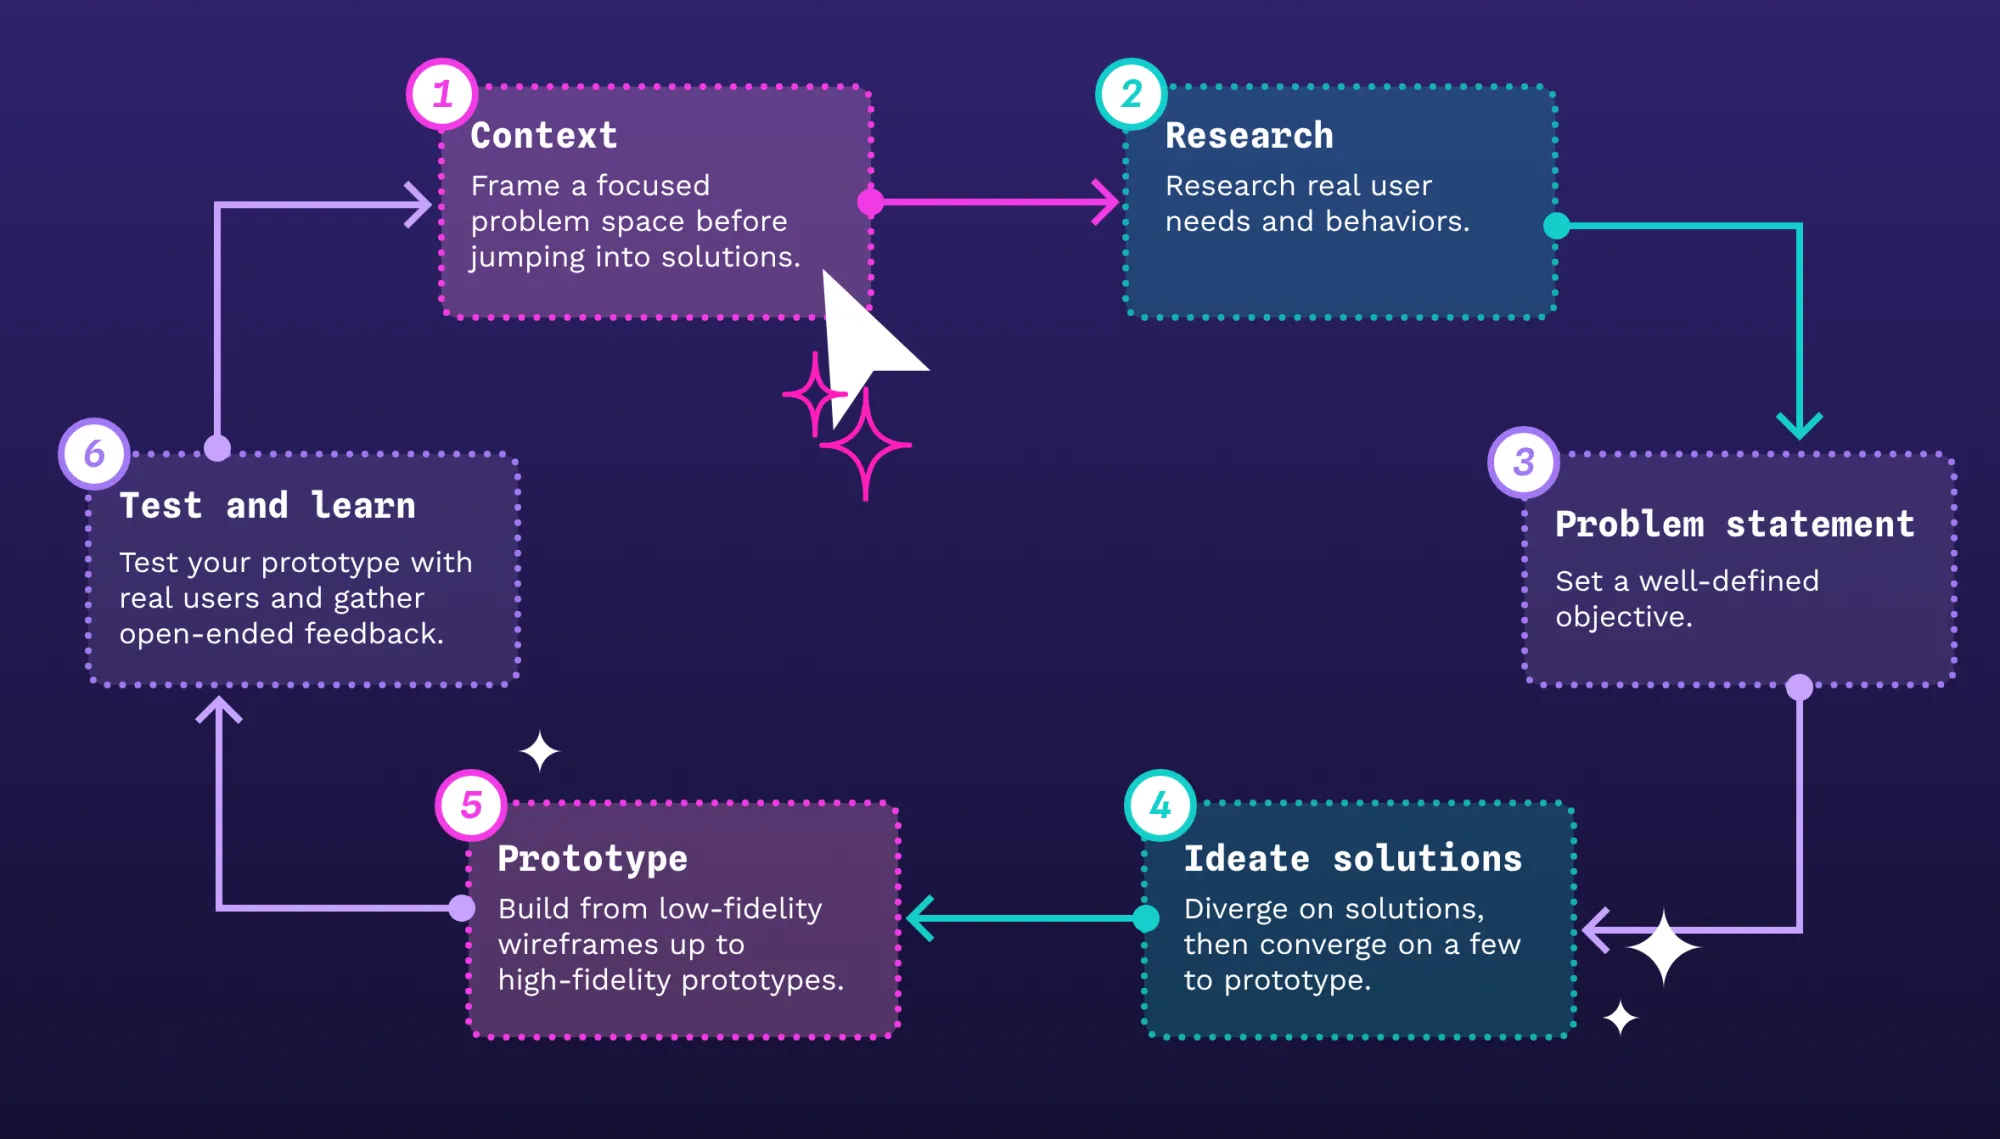
The UX design process: a loop, not a line
Use this design thinking framework to keep real users at the center from the very first sketch to later releases. A true UX design process is iterative, not linear. You don’t move through it once and ship. You’ll revisit these steps multiple times as you learn, refine ideas, and respond to new constraints.
Think of it as a loop: understand users, try something, see how it works in the real world, and improve it again. And again. Possibly one more time after that.
Let's illustrate this process with an example. Imagine you’re designing a mobile food delivery app that lets people discover nearby restaurants, customize their orders, and track deliveries in real time.
0. Frame the opportunity (Context)
While not technically the first step, this is where you prepare and clarify the problem space and constraints. This usually involves talking with stakeholders, reviewing any existing data, and doing light market/competitive research so you’re not going in blind. The goal is to define a focused area to explore and the key questions that user research needs to answer, without jumping headfirst into a solution.
For the food delivery app, you might decide to focus specifically on improving first-time order completion rather than trying to fix the whole experience at once. You'd also scan competitor apps for common patterns (guest checkout, "order again" modules, fee transparency) so your research sessions can probe what's working or failing.
1. Empathize (Research)
Before you begin designing anything, talk to people. Complete user interviews and observations, draw empathy maps, and observe people using existing products. Your job here is to understand real needs, behaviors, and pain points before you start solving anything.
In practice, that means talking to people who order takeout regularly. Ask when and why they order, what frustrates them (hidden fees? confusing menus? late deliveries?), and how they currently choose a restaurant. Then watch them place real orders on existing apps. You'll find friction points you never would have imagined.
2. Define (Problem statement)
Take all the data from the first stage and put it together. You may work with your team to create user personas and journey maps. At this point, you should be able to articulate a clear problem statement.
How does this look for the food delivery app: You might combine findings into a persona like “Josh, 34, orders delivery two or three times a week, hates surprise fees, and avoids cluttered apps.” An example problem statement could be: “Busy users like Josh need a fast, predictable way to get to a meal that fits their budget and preferences, because current flows bury key information and make choosing feel overwhelming.”
This step draws a boundary around what you’ll solve now versus nice-to-haves in the later versions.
3. Ideate (Solutions)
Now brainstorm several solutions, including those that challenge common assumptions. This is the stage for basic sketches, concept boards, and user flows. Use techniques like “How might we?” questions to get from the defined problem to a tangible design sketch. Generate more options than you think you need. Deny the premise.
The problem of “How might we reduce choice overload at dinner time?” could lead to ideas like Wednesday 30-Minute Meals menu or a budget slider that filters all options in real time.
This is also where you run a quick design studio session for team members to sketch different home screens or checkout flows, then converge on a few promising patterns to carry forward into prototyping.
4. Prototype (Create)
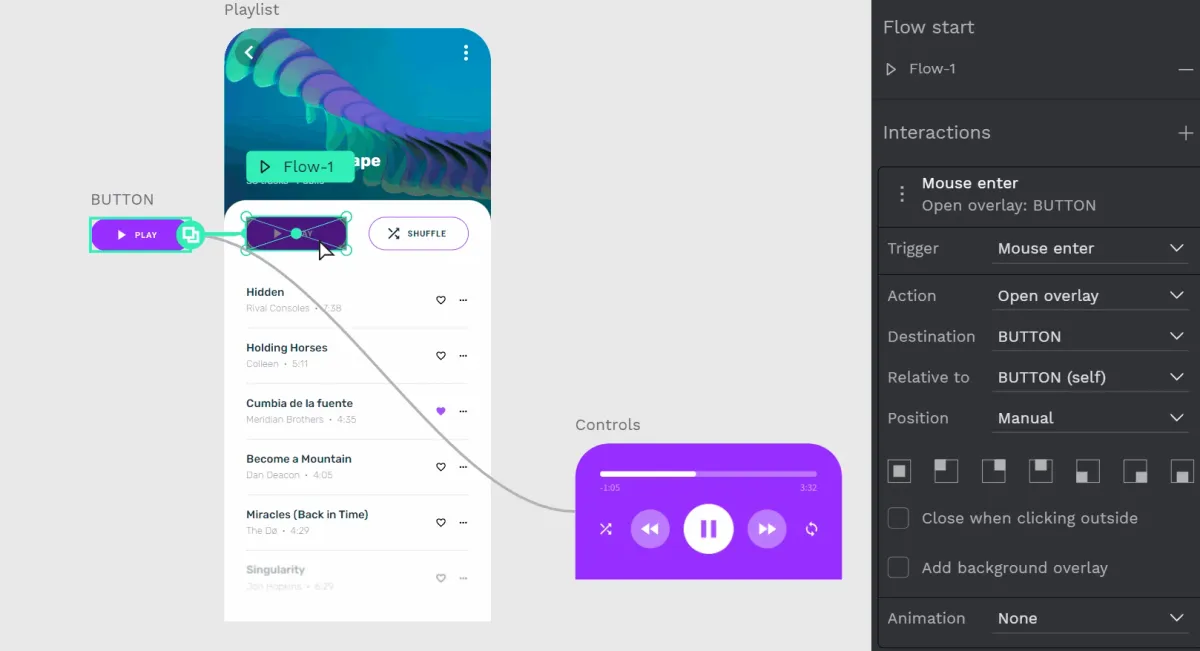
This step is where the tangible design work happens. Use low-fidelity wireframes to gather stakeholder feedback. As you get input and iterate, you can move on to high-fidelity prototypes with interactive elements. But control the urge to jump to final solutions or get bogged down in small details. (Note: Penpot’s prototyping capabilities include transitions and flows to quickly deliver these first iterations, so you can test out ideas before investing a lot of resources.)
For the food delivery app, your first pass might be low‑fi phone frames that cover the core journey from browsing menus to tracking delivery. At this stage, you’re not focusing on style, only substance.
When your design ideas have more substance, you move into a higher‑fidelity prototype with real copy, visual emphasis on key elements (like delivery time windows), and animations that make the experience feel closer to production.
5. Test (Validate)
Put a realistic prototype in front of real users. Get their feedback by using open questions to find out as much as you can; don’t limit yourself to “yes” or “no” answers. When done, you should have usability test reports and iteration documentation to help guide the next steps.
A good test task for your food delivery app might be: “You’re tired after work and want a vegetarian dinner for under $18, delivered within 40 minutes. Show me how you’d do that.” Watch where people hesitate, such as interpreting fees or trusting delivery times. Listen to what they say when they get confused or confident. The output isn’t pass/fail,, but a prioritized list of UX issues, design hypotheses to try next, and decisions about whether you loop back to refine your problem definition, ideation, or flows.
The five steps above describe the process before a single line of code is written. Once your designs move to development, the work doesn't stop. You'll have input into implementation, catch things that don't translate as expected, and make calls that no handoff document fully anticipates.
And then the product ships, and real users get their hands on it. Not prototype users, not beta testers, but people using it in the wild, distracted, impatient, doing things you never expected. That's a new source of feedback entirely. Monitor the metrics, watch how people actually move through the product, and let that data shape the next iteration. The loop doesn't close at launch. It just gets a longer cycle.
Essential UX design principles
While there may be other frameworks recognized as being UX design-friendly, Nielsen’s 10 Usability Heuristics may be the most widely accepted. They suggest that designs should offer:
- Visibility of system status so people know what’s happening
- Alignment with the real world by using familiar language and concepts
- User control and freedom to do, undo, and redo actions
- Consistency and standards that follow platform conventions
- Error prevention that minimizes user mistakes
- Recognition over recall so users don’t have to remember them
- Flexibility and efficiency through shortcuts for experienced users
- Aesthetic and minimalist design that’s free of unnecessary elements
- Clear error recovery so users can understand and fix problems
- Documentation and resources when users need them
Other common principles include user-centered design, mobile-first thinking, and visual hierarchy. You can follow an accessibility checklist that helps ensure all users, even those with audio or visual impairments, can fully experience your product.
Getting started with UX design
The best way to get started in UX design is to think about the products you use every day. Do they have good or bad UX? What works and what doesn’t? That habit of noticing is exactly the mindset you need to build solutions.
Then, familiarize yourself with a platform like Penpot, which is designed for anyone (even those with no experience) to start using right away. You can create wireframes and prototypes to give your ideas a more realistic look and feel, and even use our tutorials to build your first prototype from scratch.
Of course, if you’re looking for more help, the template library is a good place to begin. Use the existing templates to jump-start your best ideas, and get help from the community if you get stuck or need advice.
There’s no shortcut past doing the work. But the work is genuinely interesting, the field is wide open, and at the very least you’ll never be able to use a bad app again without knowing exactly why it’s bad. Whether that’s a gift or a curse is up to you.
Sign up for a free Penpot account, and get your UX design career underway.
Related blogs
If you'd like to read more about UX design, we have some similar blog posts for you: