What is prototyping? A beginner’s guide
Learn what prototyping is, why it matters, and how to get started. From low-fidelity sketches to interactive flows, this guide covers everything you need to build better products before a single line of code is written.

Prototyping is also powerful in how it tests new ideas. Handing over a prototype to a few testers can surface a lot of usability issues that might have gone undetected until the product was launched. This saves teams money and frustration by helping them build products better from the start, and gives designers more successes to celebrate
Does creating better designs with less process friction sound good to you? If so, read on to learn about the role of prototypes and how to make them using free tools like Penpot.
What is prototyping?
Prototyping is the creation of models that mimic how users would interact with a fully developed product. They are the first tangible version of a product to test, validate, and improve based on real user feedback.
The primary purpose of prototypes is to validate design decisions and improve the product before full‑scale development. They exist for iteration and should evolve by nature. While you want to have a good first prototype, it will be the first of many better examples of the final product.
Prototypes are not the same as wireframes or mockups. Wireframes are only the app or product's structure and don’t include detailed visual design elements, while mockups only cover the visual design themes.
Prototypes combine the structure, design, and functionality to show an authentic representation of an idea before it goes into full development.
Unlike wireframes, today's prototypes can also include logic, variables, and interactive states that simulate real user behavior, giving teams richer, more reliable feedback before a single line of production code is written.
Why prototyping matters
Prototyping de-risks product development by validating design decisions before heavy investment. This results in fewer costly mistakes, faster iteration, better cross-team alignment, and products that actually solve user problems. Prototypes help to:
- Validate concepts early. Teams can test assumptions before investing heavily in development and identify what works through actual interaction. There’s less risk of building features no one wants.
- Save time and money. Products can be more costly to fix after they go to market because of bad press, refunds, and more development time.
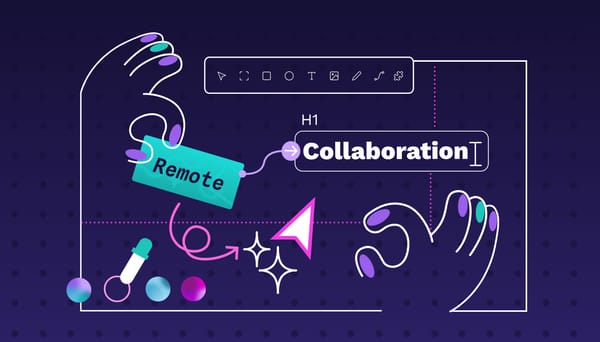
- Enhance cross-team collaboration. Prototypes act as a universal language between designers, developers, and stakeholders and make it easy for even those without technical knowledge to engage and offer feedback.
- Nurture stakeholder buy-in. It can be hard to get investors or management to approve new ideas, especially if they are lofty. Prototypes show that big ideas are possible, viable, and executable, and can even create an emotional connection with the right stakeholders.
- Accelerate iteration cycles. Prototypes enable quick exploration of different solutions and make it easier to pick one. They support agile, adaptive design processes in projects of all sizes.
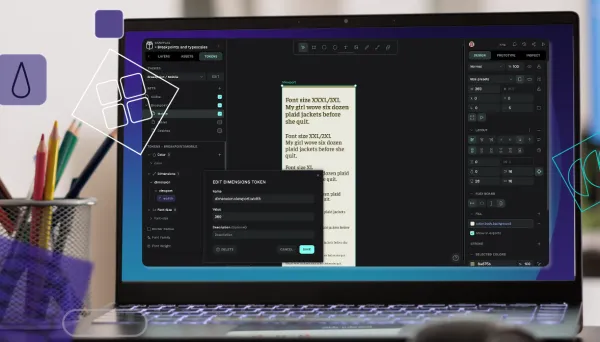
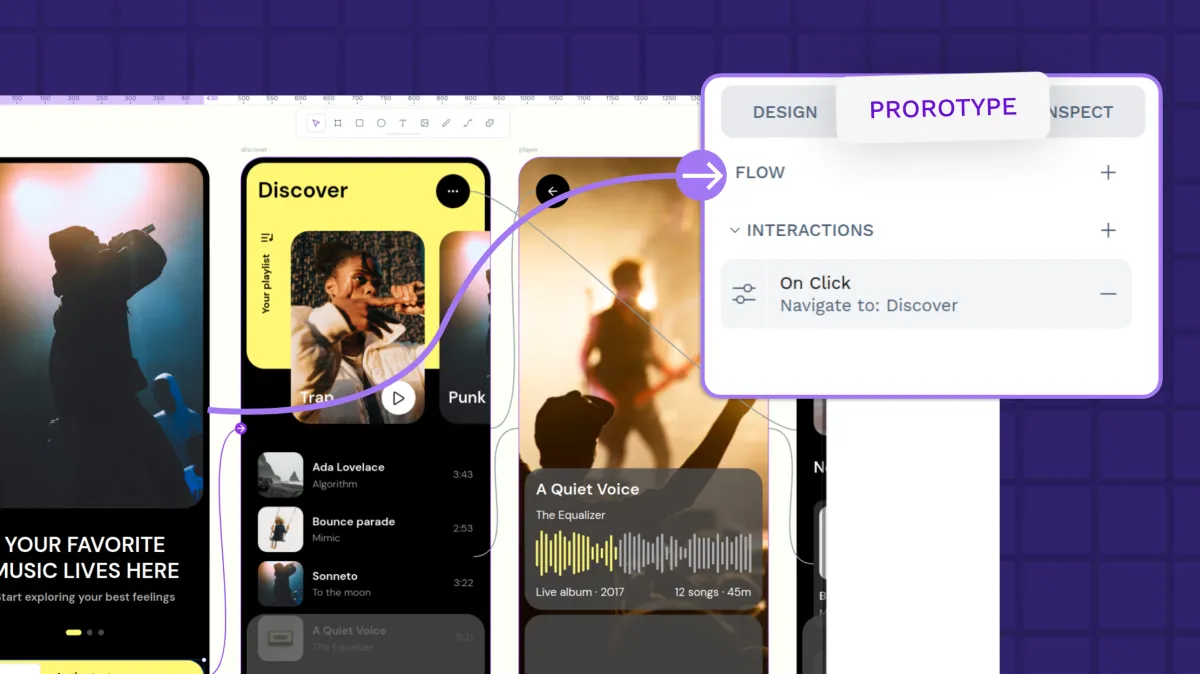
- Better developer handoff. A well-designed prototype smooths the transition from design to development. Modern prototypes often contain reusable components, transitions, design systems, and design tokens. Some platforms, like Penpot, generate code snippets or integrate with repositories directly, making the prototype part of the actual development pipeline, not just a handoff artifact.
Types of prototypes: Fidelity levels
Designers often use fidelity to describe the degree of detail and accuracy a prototype has compared to the final product. Fidelity, or how close the prototype is to a final product, is a spectrum. While we will list two levels below, prototypes can fall somewhere between; prototypes can also have characteristics of more than one level.
A useful middle ground is mid-fidelity, more advanced than sketches but without full visual polish. These are ideal for flow validation, planning user paths, and navigation testing when time and budget are limited. Digital wireframes are a good example.
Choose fidelity based on your given design stage, feedback goals, and available time and resources, as well as what you need to test.
Low-fidelity prototypes
Low-fidelity (Lo-Fi) prototypes are simple, rough representations that only show minimal structure and functionality. Examples include sketches, drawings, paper renderings, basic wireframes, and storyboards.
Use low-fidelity prototypes when you're in the early stages of design and concept exploration, or when you want to brainstorm multiple ideas quickly.
Pros:
- Easy to modify, and reduces debates about granular visual details like color or font
- Cheap or free to make, so multiple versions can be tested at once
- Easy to discard (when bad), as they require little commitment to create
Cons:
- Visually basic and requires imagination from testers
- Limited in how they test the detailed interaction or animations
- May not be real enough to measure/capture emotional responses
High-fidelity prototypes
High-fidelity (Hi-Fi) prototypes are more realistic and include UI elements, content, and interactions. They look as close as possible to the final product, featuring colors, images, animations, and clickable elements, without needing any code.
Use them in later stages of design, after core flaws have been validated, to show late-stage investors and test with real users.
Pros:
- Provides an accurate preview of the final experience
- Helps developers see exactly what to build
- Support stakeholder presentations
Cons:
- Time-consuming to make
- Can limit creativity
- May create reluctance for big changes
Common prototyping methods
Fidelity is just one way to differentiate prototypes. Each method below offers a range of realism, which matters when eliciting feedback from testers. The more realistic the prototype is, the more accurate the feedback — but not all design stages need the same level of detail.
Paper prototypes
Hand-drawn sketches and paper models can look like interface screens and even include movable paper pieces to show interaction. These cheap and accessible prototypes can be built with office supplies and help teams explore and refine many ideas quickly. It’s best for the very early stages of design, but it's difficult to facilitate virtually or with remote collaborators.
Digital wireframe prototypes
Digital wireframes use software tools to create digital representations of the product and include simple shapes and elements. They focus on layout, hierarchy, and basic functionality with only limited interactions (if any).
Because they’re digital, they support virtual collaboration and stakeholder feedback, especially when created in a tool like Penpot. They often become the foundation for the next level of high-fidelity prototypes.
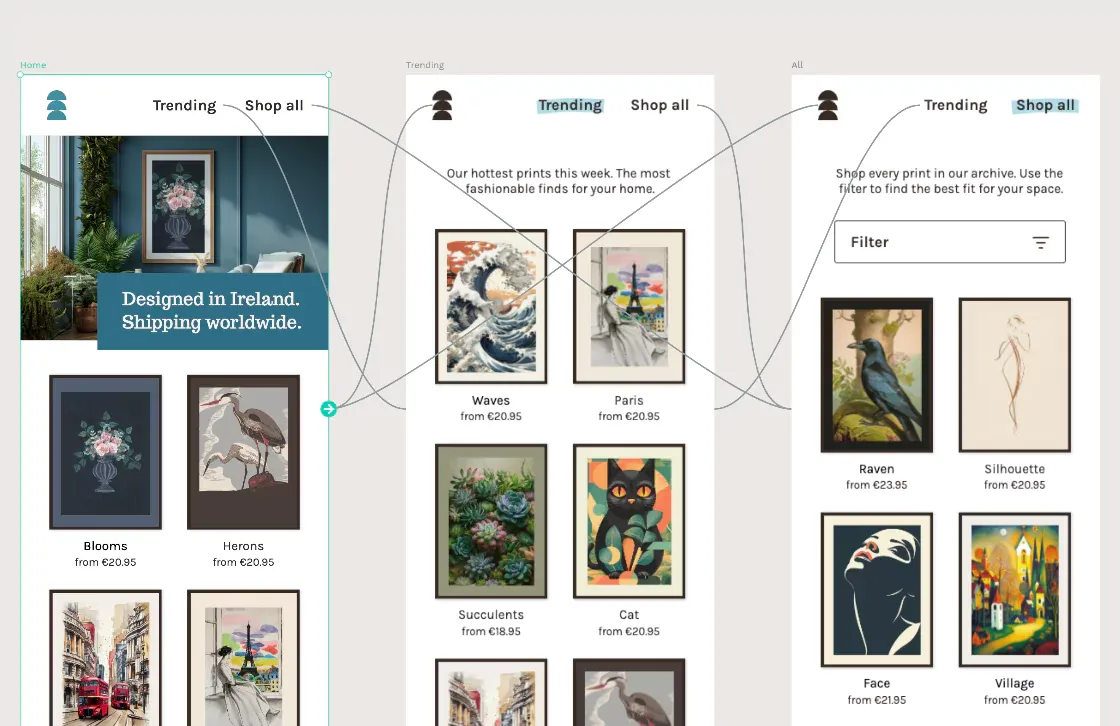
Interactive prototypes
Interactive prototypes have clickable elements and realistic user flows. Testers can tap, scroll, and swipe their way around, giving designers feedback they can use to make a product more user-friendly and functional. These mid- to high-fidelity models are ideal for mapping user journeys and validating flow logic before handing off to the development team.
Coded prototypes
Often called “functional prototypes,” coded prototypes use actual HTML, CSS, or JavaScript code and high-fidelity design to demonstrate backend functionality. Developers can connect them to databases and APIs to repurpose them into production code. They are the closest thing to a final product.
Most teams don’t need coded prototypes. Modern design tools like Penpot can simulate interactions effectively without code and can even produce some CSS and HTML code automatically from the design interface.
The prototyping process
The most important thing to remember with prototyping is that the process is iterative, not linear. Expect to revisit these steps again and again, cycling through multiple times with user focus throughout. (We have a full prototyping tutorial, but here are the basic steps.)
1. Define your goals
Clearly articulate what you're trying to achieve with your prototype, what questions you'll answer, and what aspect of the design you want to test. Questions the design team should ask include:
- Why do we need this prototype?
- What need are we addressing?
- What assumptions will we test?
- Who is the target audience?
- What decisions will this prototype help us make?
Define the scope of the prototype and document it early on within your design workflow. This way, you won’t risk trying to tackle too many decisions in one prototype, as it can be difficult to test and iterate on more than one problem at once (you can always revisit later). Focus just on what matters most for each problem you try to solve.
2. Map your user flows
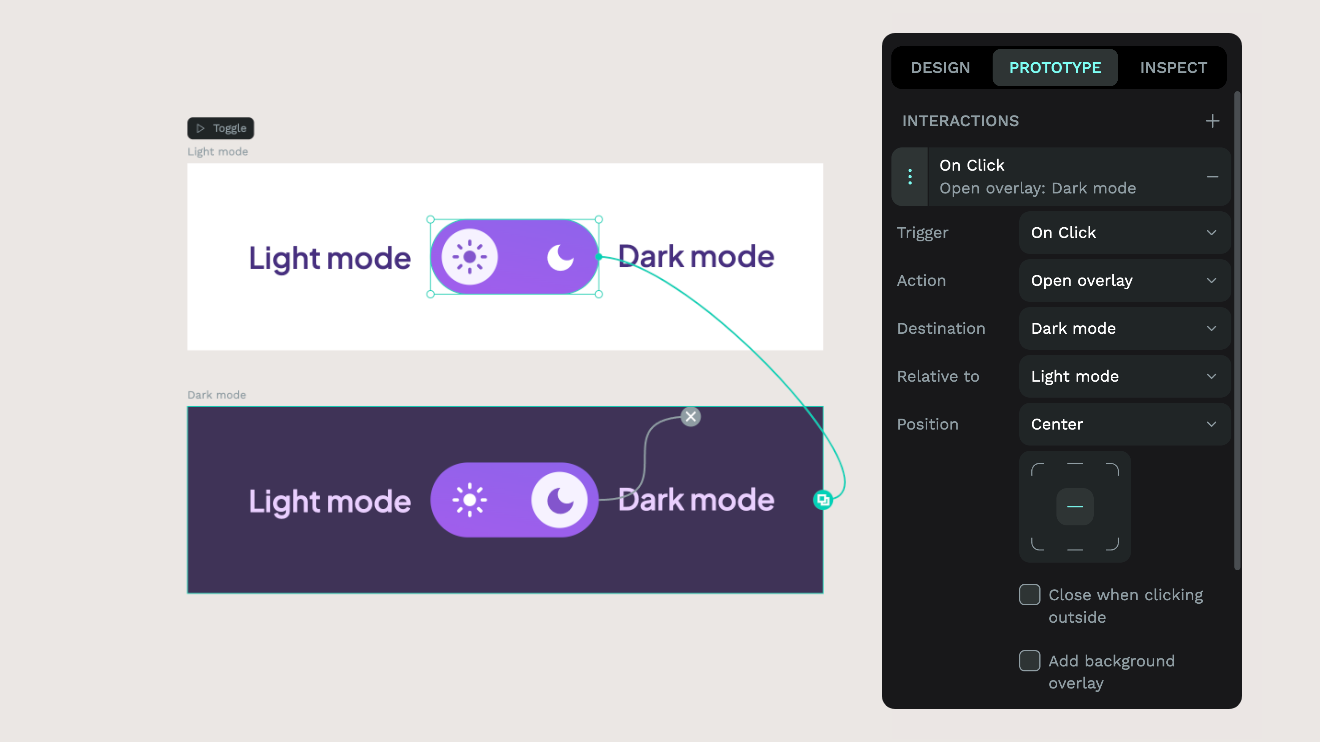
Before choosing fidelity or sketching any screen, map the paths users will take through your product. Identify the most critical tasks they need to complete and chart the decisions and outcomes along the way. This step keeps the prototype grounded in real behavior rather than assumptions. In tools like Penpot, flows also become functional entry points that let testers navigate different scenarios independently, not just planning diagrams. If you want to go deeper on this step, we cover it in detail in our guide on how to design a prototype in 7 steps.
3. Choose the right fidelity
Next, pick the right prototype for your needs. Use these general guidelines to help you decide:
- Low-fidelity: Early exploration, flow validation, testing of basic structures with limited time and budget (example: paper prototype)
- Mid-fidelity: More advanced flow validation, planning of user paths, and navigation with a limited budget (example: digital wireframes)
- High-fidelity: Visual design testing, detailed interactions, branding, and final validation with full design team resources and support (example: interactive prototypes, coded prototypes)
Match fidelity to goals, avoid over-polishing (which wastes time), and combine fidelity levels when needed into a single prototype. For example, consider Hi-Fi for key flows and Lo-Fi for secondary paths.
4. Create and test
This is where you’ll make your prototype. Focus on the critical designs and user paths and avoid getting distracted by detailed design choices, such as font, color, or background images. The basic workflow for creating and testing prototypes could look like this:
- Create your design screens
- Switch to prototype mode
- Bring in interactive elements
- Define triggers for actions
- Add animations for polished transitions
- Create flows with different starting points for different user journeys
- Share the prototype for stakeholder feedback or user testing
Choose tools that your teams can start using quickly without gaining additional technical expertise, since learning takes time away from the prototyping process. A solid tool like Penpot can be used for wireframes and interactive prototypes, and takes minutes to start using. All the steps above are intuitive in the Penpot platform, with templates and tutorials to guide you, even if you’ve never made a prototype before.
5. Iterate and refine
You may spend the most time on this step (which is actually a loop). Here, you’ll review testing notes, identify patterns, and look for recurring issues across multiple users. Distinguish between essential problems and nice-to-haves, which can be addressed in later prototypes and iterations. Fix those larger issues, such as confusing navigation, and create a new version of your prototype with the incorporated changes; just be sure to save each version appropriately in case you need to revisit them.
Retest each modified prototype with users and verify that the changes solved problems without creating new ones. Continue the cycle until you reach a satisfactory resolution, such as a navigation menu that users can intuitively use from the start. But plan for multiple iterations, depending on complexity. If you see diminishing returns on your new iterations — such as more confusion or movement away from your original goal — it may be time to stop and move forward with your most recent, successful higher-fidelity prototype, or even push on to development.
The goal of prototyping is to clarify and solve, not add more problems to be solved.
This stage is fraught with failure as you scrap seemingly good ideas again and again, but it's also an opportunity to try new things before you go to market. Time spent in prototyping saves time in development, as you can frequently catch intent or navigation issues — some of the more challenging to fix post-production. Modern platforms can help speed up this loop too: Penpot's collaborative commenting keeps all feedback in one place so designers, developers, and stakeholders stay aligned without the back-and-forth of offline files.
Prototyping with Penpot
Penpot is an open-source design platform and prototyping tool that combines design-friendly features with developer-focused outputs. Each design your team creates is expressed as workable CSS, SVG, and HTML snippets and supports exporting design tokens and layout code, which developers can reuse during implementation.
Prototyping features include interactive links, animations, transitions, overlay support, and flow management that both design and development teams can access within the same space without handoff. Penpot also supports stakeholder input through real-time collaboration features, saving time on back-and-forth and miscommunication that can occur with offline versioning and prototype files.
Ready to start prototyping with open-source tools that give you freedom? Try Penpot's prototyping features today.
Related articles
Want to learn more about prototyping? Here are more articles: