How to deploy Penpot with Docker: A Technical, Step-by-Step Guide
Step-by-step guide to deploying Penpot with Docker. Covers installation, configuration, version management, backups, HTTPS setup, and authentication for self-hosted instances.

How to deploy Penpot with Docker: A technical guide
Self-hosting Penpot is one of the fastest ways to bring design work under your own infrastructure, identity, and security controls. For many teams, Docker is the easiest path to get there: You get a repeatable setup, clean separation of services, and a standard way to upgrade or roll back when needed.
This guide walks through how to deploy Penpot with Docker using Docker Compose, from first install to updates, backups, and configuration. It assumes you're comfortable with the command line and basic container concepts, but you don't need to be an expert with Penpot or Docker to get started.
What you need before you start
Before you spin up containers, make sure you have a few basics in place.
- A host machine. Any server, VM, or local machine that can run Docker. Linux (Ubuntu, Debian) is most common for production deployments, but Docker Desktop on Windows and macOS works for testing or small teams. Plan for at least 1-2 CPUs, 4 GiB of RAM, and enough disk for Postgres, assets, and logs (10 GB minimum, more as usage grows).
- Network access. You need the ability to expose HTTP/HTTPS to your users, either directly or via a reverse proxy. Optionally, configure DNS to point a domain like penpot.your-company.com at the host.
- Docker and Docker Compose installed. If you want to use Docker Desktop download the latest version. On Windows and macOS, Docker Desktop bundles everything you need. On Linux, you can follow the official tutorial.
- Basic CLI access. Terminal access to the host, ability to edit files and run Docker commands.
If you already run other services like SQL and WebApps with Docker, Penpot can fit into that existing stack.
Alternatives to Docker for self-hosting Penpot
If you don’t want to manage Penpot through Docker, Penpot offers a managed alternative through Elestio that handles DNS, SMTP, backups, SSL certificates, and upgrades automatically. You can also use the hosted SaaS at design.penpot.app. The core experience is essentially the same regardless of deployment method.
Penpot also supports deployment via Kubernetes using an official Helm chart, which is better suited for teams that need orchestration, auto-scaling, or already run a K8s cluster. There are community-supported options, including Podman. Choose Docker if you want full control of the process, have straightforward requirements, or prefer not to depend on an external provider.
How to deploy Penpot with Docker
Below, we’ll walk you through how to set up Docker, run Penpot using the official docker-compose file, configure it for your environment, and then cover the basics of operating it over time, including upgrades, backups, and setting it up for production use.
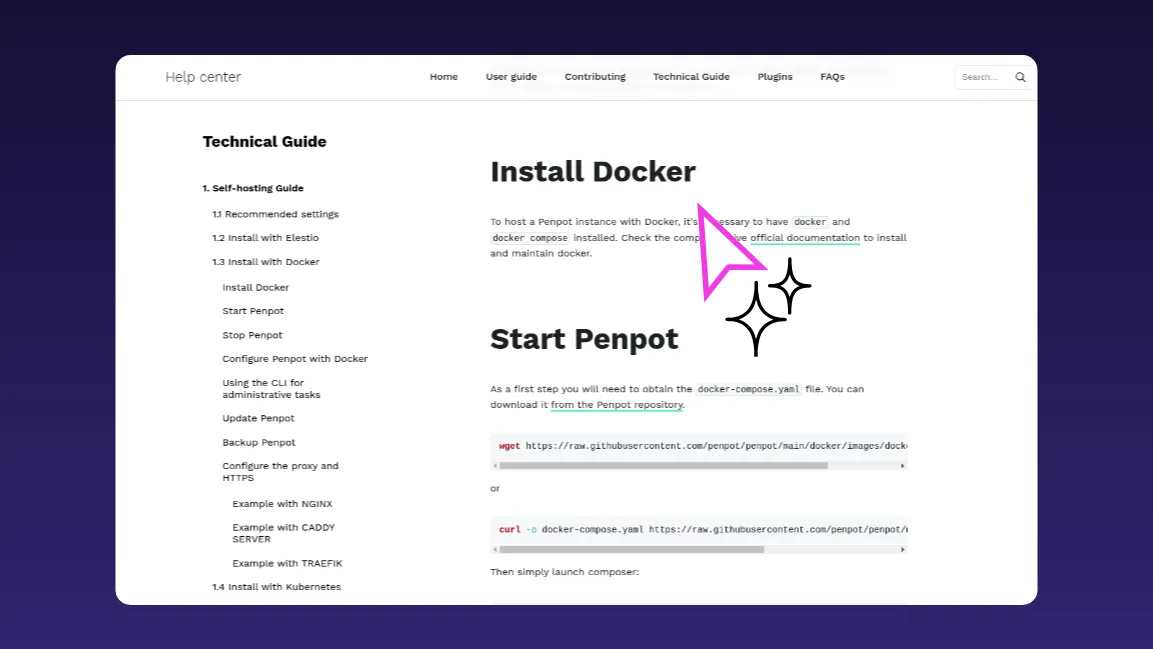
1. Install Docker and Docker Compose
If Docker is already installed and running on your server, skip this step.
Install Docker and Docker Compose using your distribution's package manager or Docker's official install script, then verify both are installed using this command in your terminal:
2. Download the Penpot docker-compose file
Penpot provides an official docker-compose.yaml that orchestrates the core services: the backend, frontend, exporter, PostgreSQL database, and Valkey (used for websocket notifications and caching).
From your server, make a Penpot folder and browse to the folder directory:
Then, download the official Penpot docker-compose file from the repository using the command below.
You can commit the official Penpot docker-compose file into your infrastructure repo if you manage infrastructure as code.
3. Start Penpot with Docker Compose
With the Penpot docker-compose file in place, run this command:
It pulls the necessary images, creates named volumes for data and assets, and starts all containers on a dedicated Docker network. Penpot will start listening on http://localhost:9001. By default, this uses the latest image published to Docker Hub.
4. Pin and manage the Penpot version
For production, use the most recent stable version from Penpot’s release notes or Docker Hub and stick to that in your PENPOT_VERSION (or image tags).
If you’re upgrading an existing deployment, choose the next stable version up from what you’re currently running and move forward in small increments rather than jumping several major versions at once. That way, you can follow the documented migration steps for each release and roll back easily if something goes wrong. When you're ready to upgrade, update the version value, pull, and restart (this is covered in Step 8).
5. Configure Penpot using environment variables
Penpot is configured through two mechanisms: flags and environment variables, both set in the docker-compose.yaml file. Flags use the format enable-<feature> or disable-<feature> and toggle specific behaviors. Environment variables start with PENPOT_ and configure settings like authentication, SMTP, and storage.
The default compose file comes with essential flags already set, plus commented-out options with explanations. A few configurations worth setting early:
Public URI: Required if you're serving Penpot to users beyond localhost:
SMTP: For email verification and password resets:
Authentication: Penpot supports email/password (enabled by default), Google, GitHub, GitLab, OpenID Connect (for SSO), and LDAP. Each provider is enabled via a flag and configured with its own environment variables. For example, to enable OIDC:
Registration controls: Restrict registration to specific email domains or disable it entirely:
The full list of configuration options is in Penpot's Configuration documentation.
6. Stop and restart the Penpot services
You’ll need to stop and restart Penpot whenever you change the configuration or upgrade versions. In Docker, that’s done by bringing the stack down and back up; the data stays safe in named volumes, so you can restart without losing any of your data.To stop Penpot, run this command:
To restart, run the up -d command as shown below.
Data is stored in named volumes, so stopping containers does not delete your database or assets.
7. Run administrative tasks with the Penpot CLI
After you’ve updated the configuration or upgraded Penpot and restarted the stack, the next step is to verify everything. For that, you’ll use Penpot’s CLI inside the backend container to create or adjust profiles without reopening registration.
Penpot includes a manage.py script for admin tasks that aren’t exposed in the UI, like creating users when registration is disabled or tailoring the first‑run experience.
For service, admin, or power‑user accounts where the product tour just gets in the way, you can create a profile that skips the onboarding tutorial:
The exact container name depends on your Docker version and platform. It could be penpot-penpot-backend-1 or penpot_penpot-backend-1. Run docker compose ps to check. This script requires the enable-prepl-server flag, which is already set in the default compose file.
8. Update an existing Penpot deployment
Over time, you’ll want to update your Penpot deployment to pick up security patches, bug fixes, and new features. To pull the latest version, run this command:
Then bring the services back up with docker compose up -d. The containers will be recreated with new images using your existing volumes.
Update in small increments rather than jumping between distant versions — large version gaps can cause migration issues. Always check the release notes before upgrading. They highlight security fixes, new features, and — most importantly — any breaking changes, deprecations, or special migration steps.
9. Back up Penpot data with Docker volumes
Penpot stores all persistent data in Docker volumes. The default compose file uses two volumes: one for the PostgreSQL database and one for user-uploaded assets (images and SVG clips). Additional volumes may exist if you've enabled other features.
You cannot directly copy the contents of the volume data folder. Docker provides a volume backup procedure that uses a temporary container to mount volumes and copy their data to an archive.
For the database, you can also run pg_dump against the Postgres container:
For assets, mount the volume in a helper container and tar the directory, or use your storage tooling if assets live in S3.
Set up regular automated backups by using cron jobs on the host or a dedicated backup container that runs pg_dump against the Postgres container and archives the assets volume on a schedule. Losing the PostgreSQL volume means losing all project data. Losing the assets volume means losing every image and SVG clip your team has uploaded.
Restores are the inverse. To restore from a backup, follow the steps below:
- Stop Penpot: docker compose down
- Restore database: gunzip penpot.sql.gz && docker compose exec -T penpot-postgres psql -U penpot penpot < penpot.sql
- Restore assets: tar xzf assets.tar.gz -C /path/to/penpot_assets/
- Start Penpot: docker compose up -d
10. Configure a reverse proxy and HTTPS
Penpot should run behind HTTPS in production. Running without it disables certain browser APIs (clipboard, for example) and is not recommended for anything beyond local testing.
Your proxy needs to forward traffic to http://localhost:9001 and handle WebSocket connections for the /ws/notifications path.
Install NGINX on the same host as your Penpot containers, listening on ports 80/443, and proxying to localhost:9001. (If you have multiple apps on one host, NGINX can route based on domain names.)
Create /etc/nginx/sites-available/penpot with this config:
Then enable and restart NGINX:
Caddy and Traefik web servers are also supported. The Penpot Docker documentation includes examples for all three. Adjust TLS, logging, and headers to match your security standards.
If you need to serve Penpot on a domain other than localhost without HTTPS (for testing only), add the disable-secure-session-cookies flag to PENPOT_FLAGS (not recommended for production).
Next steps for your self-hosted Penpot instance
With Penpot running and reachable over HTTPS, you've covered the basics: containers, data volumes, and a secure entrypoint. From here, there are two areas to explore next because they complete the enterprise deployment pattern and integrate Penpot into your existing security and workflow stack.
Configure authentication. Penpot supports built-in email/password, LDAP directories, and OIDC providers (with presets for GitHub, GitLab, and generic OIDC). The authentication configuration explains how to enable additional backends, point Penpot at your identity provider, and control registration behavior. Aligning Penpot with your existing SSO is usually one of the first things security teams ask for.
Integrate Penpot with your stack. Penpot's APIs, plugins, and integration points let you embed design workflows into your broader tooling. Common patterns include exporting design tokens into code, building plugins for custom workflows, and wiring Penpot into CI/CD or documentation pipelines as a source of design truth. Read the Integration Guide for concrete examples.You've now deployed a production-ready, self-hosted Penpot instance under your own infrastructure and security controls. The Docker approach gives you a repeatable deployment pattern, clear upgrade path, and the same operational tooling you use for other services.
Check out the authentication and integration guides to get the most out of your Penpot deployment.